Scanning documents from your printer to your computer is a straightforward process that can enhance your productivity. Whether you need to digitize important papers or create backups of your documents, understanding how to use your scanning device will save you time and frustration. In this comprehensive guide, we will take you through every step of the scanning process. We will cover various types of printers, explore the necessary software, and troubleshoot common issues.
Understanding Your Printer’s Capabilities
Types of Printers
Before you start scanning, it is essential to understand what type of printer you have. There are primarily three types of printers on the market: inkjet, laser, and all-in-one (multifunction) printers. Each type may vary in its scanning capabilities.
Inkjet printers are commonly used for home and office settings. They are versatile and often include scanning functions. Laser printers, on the other hand, are more efficient for high-volume printing. Many modern laser printers also have scanning features. All-in-one printers combine printing, scanning, and copying functions into one device. They are ideal for those who need a single machine for multiple tasks.
Checking for Scanning Functionality
First, verify if your printer has scanning capabilities. Look for a flatbed scanner on top of the printer. If there is an Automatic Document Feeder (ADF), it can make scanning multiple documents significantly easier. Always consult the user manual that came with your device for detailed instructions, including information about scanning resolutions, formats, and other features.
Sometimes, the scanning function may be disabled or not properly set up. Check the control panel on your printer. There may be a button or menu option that clearly indicates scanning functionality. Familiarize yourself with the controls and layout, so you can navigate easily.
Installing Necessary Software
Downloading Drivers
To successfully scan from your printer to your computer, you need the correct drivers installed on your system. Usually, these drivers come with the printer on a CD. However, many printers do not have CD readers anymore. In such cases, you can go to the manufacturer’s website. Search for your printer model and download the latest drivers and software compatible with your operating system.
Installing the software is crucial because it serves as a bridge between your printer and computer. During installation, make sure to select all options related to scanning. This will ensure that your system recognizes the scanning capabilities of your printer.
Setting Up Scanning Software
Once you have installed the necessary drivers, you may need additional software for scanning. Many manufacturers provide their own scanning software that works seamlessly with their printers.
Check if your printer has a dedicated scanning application. Install it as per the instructions given. This software typically offers various scanning options, including resolution settings and file formats. Some printers may also be compatible with third-party scanning applications. Look into options like Adobe Scan or VueScan depending on your requirements.
Scanning Steps: A Detailed Overview
Preparing Your Document
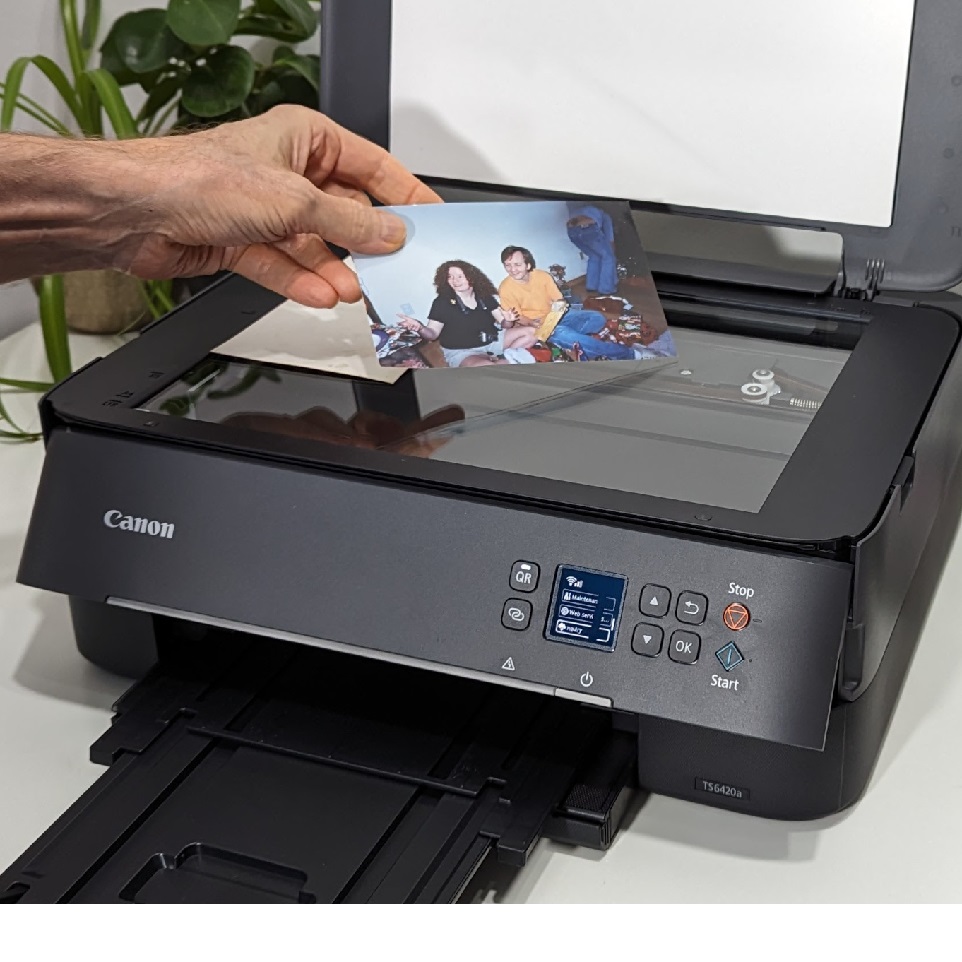
Your scanning experience starts with preparing the document you want to scan. Begin by clearing the glass surface of your printer. Dust, fingerprints, or any other obstructions can lead to poor scans. Use a clean, soft cloth to wipe the scanner bed.
Next, place your document face down on the scanner glass. Position it in the corner for accurate alignment. If your printer has an Automatic Document Feeder (ADF), you can load multiple pages into it. Make sure to check the maximum capacity of the ADF to avoid jams.
Starting the Scan Process
Once your document is ready, turn on your printer and computer. Open the scanning software that you have installed. This software should detect your printer automatically. If it doesn’t, you may have to troubleshoot the connection.
After the software is open, you’ll need to select the scan option. This is often labeled as “Scan,” “Scan to Computer,” or something similar. Choose the desired resolution and file format. Common formats include JPEG, PNG, and PDF. Each format has its own advantages, so choose according to your needs.
Press the “Scan” button in the software. The document will begin to scan. You may see a preview on your computer screen, allowing you to confirm that everything looks good.
Saving and Organizing Scanned Files
Choosing the Right File Format
After scanning, you’ll be prompted to save the file. Choosing the right file format is important for your needs. For example, if you plan to edit the document later, saving it as a PDF may be the best choice. PDFs preserve formatting and are suitable for sharing. If the scanned document contains images, JPEG or PNG formats are ideal.
Be sure to give your scanned file a descriptive name. This helps in identifying documents later without having to open each one. Include the date and a brief description for easy reference. For example, “2023-10-15_BusinessProposal.pdf” is much more informative than “scan1.pdf.”
Organizing Scanned Documents
Organizing your scanned documents effectively is key to maintaining an orderly digital workspace. Create dedicated folders for different categories. For instance, you may have folders for “Invoices,” “Personal Documents,” and “Work Projects.” Use a consistent naming convention across all documents.
Regularly review and clean your folders. Delete unnecessary files to save storage space. Consider backing up your documents on cloud storage services, like Google Drive or Dropbox, for added security and easy access from different devices.
Troubleshooting Common Scanning Issues
Printer Not Recognized
If your computer does not recognize the printer, start by checking the connection. Ensure that the printer is turned on and properly connected to the computer via USB or Wi-Fi. If it’s a wireless printer, verify if both devices are on the same network.
Sometimes, reinstalling the printer drivers can resolve this issue. Make sure to follow the installation instructions carefully. If the problem persists, consult the user manual or the manufacturer’s support website for further assistance.
Scanned Documents Are Blurry
Blurry scans can be frustrating. Several factors may contribute to this issue. First, double-check the cleanliness of the scanner glass. Dirt or smudges can significantly hinder scan quality. Also, verify the settings you chose for scanning. Higher resolutions typically yield better quality scans.
If you’re using the ADF for multiple pages, misalignment can lead to blurry documents. Make sure the pages are aligned correctly when loaded. Sometimes, an issue with the printer’s internal software can also cause this. A firmware update may be necessary to resolve the issue.
Advanced Scanning Features
Utilizing OCR Technology
Some advanced scanning software offers Optical Character Recognition (OCR) technology. This feature allows you to convert scanned documents into editable text files. If you frequently need to edit or manipulate text, using OCR can be a game-changer.
To use OCR, make sure your scanning software supports it. After scanning, select the OCR option and follow the prompts. The software will analyze the document and convert it into a format that can be edited, such as a Word file.
Batch Scanning
Batch scanning allows you to scan multiple documents in one go. If your printer has an ADF, you can load several pages at once. This feature is especially useful for large projects or when you need to scan an entire file.
Once you load the documents, open your scanning software, select the “Batch Scanning” option, and press “Scan.” The printer will process each page consecutively. Most software will save each page as a separate file or compile them into a single PDF, making document management more efficient.
Scanning to Email
Modern scanners allow you to scan documents directly to email. This function saves time and reduces steps in your workflow. To use this feature, open the scanning software and select the “Email” option.
The software will automatically attach the scanned file to a new email. Enter the recipient’s email address, add a subject line, and send it directly from the application.
Final Thoughts on Scanning from Printer to Computer
Mastering how to scan from a printer to a computer can streamline your work process and reduce paper clutter. With the right equipment and knowledge, digitizing important documents becomes an effortless task. Always keep your printer updated with the latest drivers and software to enjoy improved performance.
Experiment with various scanning features, such as OCR and batch scanning, to maximize efficiency. These advanced functions will only enhance your digital document management. Scanning can also help protect important documents by creating digital backups. If anything happens to the physical copies, you’ll have peace of mind knowing you have digitized versions.
Now that you are well-equipped with knowledge and practical steps, you can confidently scan documents to your computer. Happy scanning!