Introduction
In today’s digital age, capturing screenshots has become an essential skill for various purposes, ranging from creating tutorials and reporting bugs to simply sharing exciting moments from your screen. If you’re an HP desktop user, you might wonder how to harness this capability effectively. Fear not, for this in-depth guide will walk you through different methods to capture and customize screenshots on your HP computer, ensuring you never miss a crucial visual again.
Understanding the Basics of Screenshots
Before diving into the specifics, let’s clarify what a screenshot is and why it’s useful. A screenshot, also known as a screen capture or print screen, is an image taken of your computer screen’s contents at any given moment. It’s a powerful tool for documentation, communication, and creative expression. With HP desktops, you have several ways to take screenshots, each suited to different needs and preferences.
Using the Print Screen (PrtScn) Key
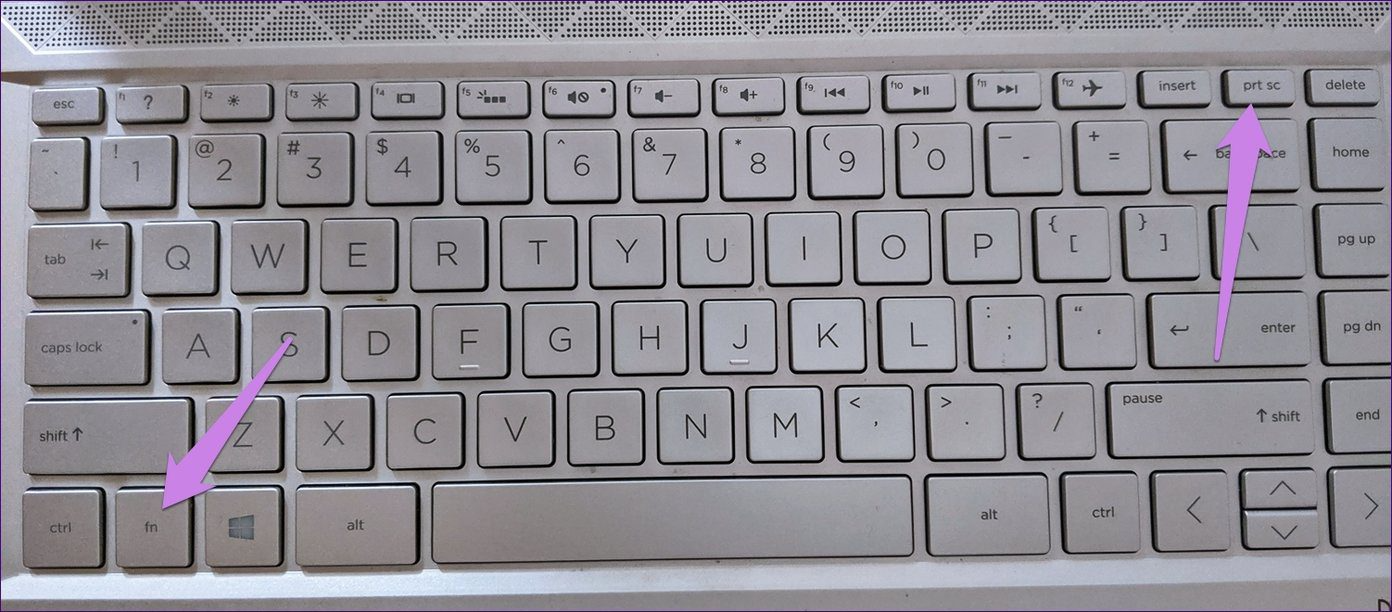
The simplest method to take a screenshot on your HP desktop involves using the Print Screen key, usually labeled “PrtScn” or “PrtSc.” This key captures the entire screen and saves the image to your clipboard.
- Ensure the content you want to capture is visible on the screen.
- Press the “PrtScn” button. By doing so, your screen’s image is copied but not saved as a file yet.
- Open an image editing program like Microsoft Paint or Photoshop.
- Paste the screenshot (Ctrl+V) into the program.
- Save the image in your desired format (JPEG, PNG, etc.) by going to ‘File’ > ‘Save As.’
Capturing Specific Windows with Alt + PrtScn
If you only need to capture a single open window rather than the entire screen, the combination of the “Alt” and “PrtScn” keys comes in handy.
- Click on the window you wish to screenshot to make it the active window.
- Press “Alt” + “PrtScn.”
- Follow steps 3-5 from the previous section to paste and save your screenshot.
Utilizing Built-In Snipping Tools for Enhanced Functionality
For more advanced screenshot capabilities, Windows 10 and later versions introduced the Snipping Tool and its successor, Snip & Sketch, which offer greater control over your captures.

Snipping Tool: The Classic Approach
- Search for “Snipping Tool” in the Windows search bar and launch it.
- Choose your snip type: Free-form, Rectangular, Window, or Full-screen.
- Select the area you want to capture by dragging your cursor or clicking directly on a window.
- Edit the screenshot if needed using the tool’s markup functions.
- Save the screenshot by clicking ‘File’ > ‘Save As.’
Snip & Sketch: The Modern Upgrade
Snip & Sketch offers similar functionalities with a more intuitive interface and additional features.
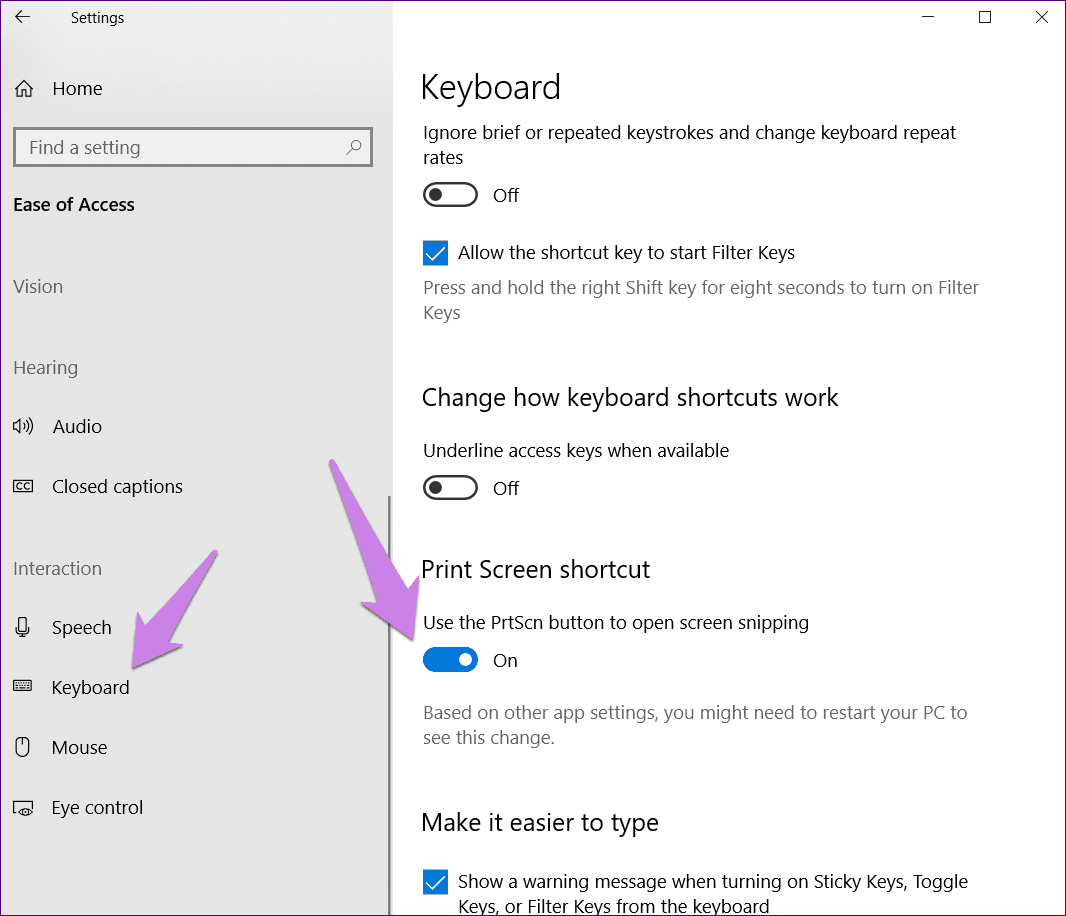
- Press “Windows key” + “Shift” + “S” to activate the snipping toolbar instantly.
- Choose your snipping mode and capture the screen.
- The screenshot will be temporarily saved to your clipboard and a notification will appear. Click on it to open Snip & Sketch for editing or saving.
- Use the editing tools to annotate, highlight, or crop the image as needed.
- Save your work by selecting ‘File’ > ‘Save As.’
Leveraging Third-Party Applications for Advanced Needs
While Windows’ built-in tools cover most screenshot scenarios, third-party applications like Greenshot, Lightshot, or Snagit offer even more advanced features, such as timed screenshots, automatic file saving, and advanced editing capabilities.
- Download and install the software of your choice.
- Familiarize yourself with the app’s interface and hotkeys for quick screenshot capturing.
- Customize settings to suit your workflow, such as output folder, file format, and shortcut keys.
- Use the software to capture, edit, and manage your screenshots efficiently.
Tips for Effective Screenshot Management
Organize with Folders
Create a dedicated folder structure for your screenshots, categorizing them by project, date, or purpose. This makes it easier to locate specific screenshots when needed.
Use Descriptive Filenames
Rename your screenshots with descriptive filenames that briefly explain the content. For example, instead of “screenshot001.png”, use something like “Website_Homepage_Redesign_2023-04-05.png”. This helps in quickly identifying the screenshot’s content without having to open it.
Timestamps
Incorporate timestamps into your screenshot naming or metadata, especially if you take multiple screenshots of the same interface or during a process. This is particularly useful for tracking changes over time.
Utilize Cloud Storage
Services like Google Drive, Dropbox, or OneDrive can help you store and organize screenshots across devices. They also often have built-in search functions that can help you find screenshots based on file names or content.
Screenshot Tools with Built-in Features
Use screenshot tools or software (like Snagit, Lightshot, or Greenshot) that offer features such as annotation, cropping, and direct organization into folders or projects. These tools often allow for more efficient workflow management.
Create a Catalog or Index
If you deal with a high volume of screenshots, consider maintaining a simple spreadsheet or document that acts as an index, listing the filename, description, and where it’s saved. This can be especially helpful for large projects.
Regular Cleanup
Schedule periodic reviews of your screenshot collection to delete duplicates, irrelevant, or outdated screenshots. This helps keep your storage organized and efficient.
Annotate Effectively
When sharing screenshots, annotate them to highlight key points or instructions. This can reduce the need for additional explanatory text and make communication clearer.
Batch Processing
If you need to resize, rename, or convert a large number of screenshots at once, use batch processing tools. Software like Adobe Bridge, IrfanView, or Bulk Rename Utility can automate these tasks.
Integrate with Project Management Tools
If you’re working within a team, consider integrating your screenshot management with your project management tool (e.g., Trello, Asana, Jira). This way, screenshots are directly linked to relevant tasks or issues, improving collaboration and context understanding.
By implementing these practices, you can significantly improve the efficiency and effectiveness of managing your screenshots, whether for personal projects or professional teamwork.
Conclusion
Capturing screenshots on your HP desktop is a straightforward process that can be as simple or as sophisticated as your needs dictate. Whether you opt for the basic Print Screen function, delve into the versatility of Snipping Tool or Snip & Sketch, or explore the depths of specialized third-party software, mastering screenshot techniques empowers you to communicate visually with precision and efficiency. With these tools and strategies at your disposal, you’re well-equipped to navigate the digital landscape with confidence and creativity.